This panel will allow you to create and modify PSG instruments - that is, instruments such as the sound processor can naturally produce without any trick (contrary to samples, SIDs, etc.).
The editor looks like this:
Arkos Tracker 2 uses more or less the same principle as Arkos Tracker 1 and STarKos, but improves it, to be more streamlined and even more powerful.
Instruments are composed of lines. Each line is played, by default, every 50hz (according to your player speed), but each instrument has a speed, making it possible to have a very slow (and long) sound.
There can be 256 lines per instruments, which is more than you will ever need (most instruments will only use 1 to 15 lines, in average).
An instrument can loop, or not, in which case silence will be heard once the instrument has reached its end.
A line defines what sound should be heard: what frequency? What volume? With or without noise? By combining these lines, you can get complex and expressive sound: this can be a simple fading sound, or a long sound for a melody, or a snare, or any special effect you dared to imagine.
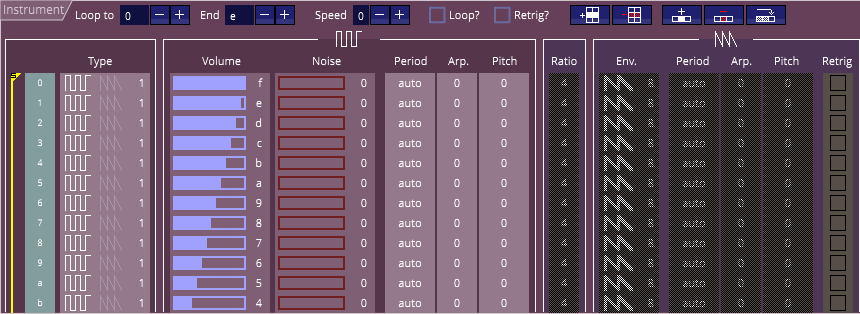
The top components
![]()
At the top-left can be seen three sliders:
- Loop to: line where the sounds should loop, 0 being the first line. If the sound isn't looping (see below), this value is useless.
- End: last line played before, either the sounds should loop, or stops, if the sound isn't looping.
- Speed: how fast is the sound. That is, how many ticks are spent before moving to the next line. 0 means that there is no wait: this is the fastest speed. 255 means that the player will wait about 5 seconds on each line! So that is slow.
Then, two checkboxes:
- Loop?: if ticked, the sound will loop. Once the last line is played (indicated by the end value), it will go back to the line indicated by the loop start value. If not ticked, the sound will stop once its end is reached.
- Retrig?: if true, it will force the hardware curve to restart when the sound starts. This is clearly not something you will do often, so don't bother too much with it if you're a beginner with YM/AY and Arkos Tracker. Else, read the "retrig" part below for more information.
Then, you can see buttons:
- Insert line
 : this insert lines where the cursor is. The new inserted lines are duplicates of the existing ones, so you can use this to make copies of a block of lines.
 - Delete line
 : this deletes the lines selected by the cursor.
 - Insert cells
 : this inserts cell or cells where the cursor is. The new cells are duplicates of the selected ones. Warning, the cells that out of boundaries are destroyed.
 - Delete cells
 : this deletes the selected cells. A default value is used to fill the incoming cells.
 - Spread cells
 : this (somehow overlooked) option is very handy to copy the selected cells till the end of the instrument. This is handy to duplicate cycling values such as arpeggios for example.
The columns

Here is the description of each column.
Type
This column is very important, as it defines how the line will sound. According to it, some columns will be disabled because not taken in account.
- No soft, no hard (0): When using this type, there is no sound! That is, no note is generated. So what's its use? Well, you could use it to stop the sound, for a special effect. But the main use is elsewhere: you can still produce noise! Only the noise and the volume are available in this case. So this type is useful mainly for drums.
- Soft only (1): This is the most used type. It will produce the nice, rectangular sound that we are all fond about (are we all not?). You can use the volume, an arpeggio and pitch if you like.
- Soft to Hard (2): This is also very used. This is the typical hardware sound you hear in every modern YM/AY music. This is especially used for bass, as it may be quite ugly for high-pitched sound, depending on how you use it. Basically, the frequency is first calculated for the software part. Once it is done, the frequency is transmitted to the hardware part, adding more "life" to the somehow boring rectangular wave. In output, we have a rectangular wave modulated by the hardware curve.
- Hard only (3): This interesting mode isn't used often, yet it should. In it, the software wave is disabled, so there is no rectangle wave. However, the hardware curve is on: according to the one chosen, you can have sawtooth or triangle wave. It sounds good for both bass and melodies. Two drawbacks: you can't set the volume, as the curve manages the volume itself, according to the hardware curve. And such curves will sound softer than a pure software (rectangle) sound.
- Hard to soft (4): Another not-often-used-yet-it-should-be type, called "sync" in STarKos (but is it more powerful with AT2!). This is the opposite of the "Soft to Hard": first, the hardware period is calculated, and the software wave will be generated according to it. The result is a very "still" result, which can be desynced at will, resulting in very interesting sounds, especially for bass. High-pitched sounds will very quickly sound out of key!
- Hard and soft (5): Could be considered experimental, but has a few uses. Basically, it allows the software and hardware part to be autonomous. You could play a C in the software part, yet another note in the hardware part. With a bit of experiment, you can simulate two channels with just one channel! However, one simple yet effective effect is the "Ben Daglish" sounds: the hardware period is forced to a very low value (1, 2, 3...) yet the software period is normal: you can get funny melodic sounds. I saw a few musicians using it systematically instead of using the Soft To Hard type. Do not. Hard And Soft takes more CPU to handle, plus all the pitch effects inside the tracks will not work gracefully (quick explanation: the same pitch amount is added to the two periods (software and hardware), resulting in a desynchronization of the two waves: ugly!).
The software part
The software part holds the parameters about the software sound generator. This deals everything about the "rectangle" wave the YM/AY can produce.
Volume
Quite simple to understand, the volume indicates how soft or loud the rectangle wave is, from 0 (inaudible) to 15 (&f, full). It is disabled as soon as the hardware part is involved (because the hardware takes control over the volume).
Noise
The noise is especially used for drums and special effects. 0 means no noise, else it varies from 1 (light noise) to 31 (low noise). It is the only parameter, along with the type, that is always available.
Period
This is the period of the software sound. The period is the invert of the frequency. If the latter comment confuses you, don't worry: simply understand that it defines how high or low your sound is! The lower the period, the higher the pitch of the sound is.
The period can vary from 1 (very high pitch) to &fff (very low). But most of the time, you will use 0, meaning "auto" (you can type "auto" directly, but if you type "0", it will be transformed into "auto"). What "auto" means? It means that the period of your sound matches the one of your score. Most of the time that's what you want! You want your sound to "play" your music.
Now why would someone force the period to 1 or 10 or &123? For special effects, most of the time. Especially if coupled with hardware sound... If all this confuses you, don't worry: use "auto" and everything will be fine.
Finally, setting a period to anything but "auto" will disable the Arpeggio and Pitch columns.
Arpeggio
This indicates how many semi-tones to add - or subtract - to the base note (from -&7f to &7f). This adds a lot of expression to the sound. For example, you can have a first line with an arpeggio of 12, that is, a whole octave, to add a nice attack to your sound. Or you can even add chords: one line at 0, the next at 4 the next at 7: you have a major chord.
Note that Arkos Tracker 2 now supports both arpeggios in the instruments (like described here) and in the tracks. So it is probably simpler to add your chords inside the tracks (see the Pattern Editor section). So why use Arpeggio here? For at least three reasons:
- You are used to STarKos and AT1, and like doing it like that.
- Arpeggios in tracks and instruments are not exclusive: they are added! So you can get surprisingly expressive sounds by combining both. For example, use octave arpeggio in the instrument, and chords arpeggio in the tracks: the result will always be great. Plus, as they can have different cycle length, it will sound even richer.
- Combining arpeggios and hardware sound is tricky, because most of time, it requires tweaking to sound right: having this kind of control in the track won't be as easy as doing it here.
Pitch
Last in the software section, the pitch will add a little (or a big!) bump in the frequency (from -&fff to &fff). It is effective at the beginning of a sound to add a little attack. But most of the time, you will use it to create a vibrato effect.
However, don't forget that Pitch can be added inside the track, which can be more handy than using this pitch. Just like the arpeggio, the pitch of the instrument is added to the pitch of the track, so it is possible to have very rich effects by combining them.
A second and more advance use of the pitch is when the Hard To Soft type is used: first the hardware period is calculated. It is transmitted to the software period. The pitch here can be added to add a desynchronization between the two curves.
The hardware part
The hardware part actually only consists in using the (unique!) hardware volume generator of the YM/AY. In itself, it is not exciting: you can choose a curve (sawtooth, triangle, etc.) and it will manage the volume according to the given hardware frequency. You can do fade in/outs automatically, but only from 0 to 15 and the opposite! Quite limited.
But the real strength of the hardware sound happens with using looping curves and high frequencies. You get a whole new world that includes sawtooth and triangle waves! You can couple them to the software wave (the rectangle wave) for even more expression.
There is one drawback: the hardware generator is unique. There is only ONE. So if you activate it for several channels, they will share the same hardware curve and, worst, frequency! Unless that is what you want, this may provoke a not-so-musical sound in the end. So, as a rule of thumb: only one hardware sound at one time per PSG (so if you're composing for the PlayCity or any hardware with several AYs, you can circumvent this limitation!).
Ratio
This column is neither in a "software" or "hardware" part. It is only available if both hardware and software are used: it serves as a mean to calculate the period of one part according to the other.
Example: you used the "Soft to Hard" type. So first the software period is calculated, then the hardware period derives from it. But how? Easy: thanks to the ratio.
Ratio in "soft to hard"
The formula is simple. In "Soft to Hard": hardwarePeriod = softwarePeriod / (2^ratio).This scares you? This shouldn't. Let's take an example. If the ratio is 0 and my software period is 568 (a A2 on CPC): hardwarePeriod = 568 / (2^0) = 568. No change. This will probably won't sound very good (just try).But let's use a ratio of 4: hardwarePeriod = 568 / (2^4) = 35.5, rounded to 36. This sounds great!
One thing to notice is that the hardware period has been rounded. This approximation provokes a desychronization between the software and hardware frequency, resulting in a "mwaaaaah" sound, which most of the time, is interesting.
Now if you do the same for a higher-pitched sound and a higher ratio: hardwarePeriod = 142 / (2^6) = 2.21875, rounded to 3. This sounds awfully bad! That's why, most of the time, you will use lower pitch when mixing software and hardware envelopes, because there is more accuracy.
Ratio in "hard to soft"
The calculation is the opposite: softwarePeriod = hardwarePeriod * (2^ratio).The good news about it is that there is no loss of precision in multiplying the period, so that's why the "hard to soft" is so "still" (no "mwaaaah" sound): the software and hardware waves are synchronized.
Summing up
Most of the time, you will keep the ratio between 4 and 5. But don't be afraid to experiment!
Envelope
This indicates what hardware envelope is used. It is only available in modes where the hardware generator is enabled ("hard only", "hard to soft" and "soft and hard")!
All the relevant envelopes available on the YM/AY can be selected (from 8 to 15, the ones from 0 to 7 are duplicate). However, you will probably use only 4 of them:
- The sawtooth (8 or its mirror curve C)
- The triangle (A or its mirror curve E) (alternating them quickly sounds nice, most of the time).
Why only them? Because the others don't loop. So they are only useful to make fade in/outs (which I advise you to do by hand instead. Remember, there is only one hardware generator, don't waste it doing trivial sounds!).
Period
This works exactly as the software period, except it has a larger range: from 1 to &ffff. Use 0 or "auto" for the hardware period to be calculated automatically.
However, the hardware period is only available in the "hard only", "hard to soft" and "soft and hard" modes, else it will be either mute, or calculated from the software period and the ratio.
Arpeggio
The same as for the software arpeggio. Only available for the same modes as the "hardware period", explained just above, and if the hardware period is "auto".
Pitch
The same as for the software pitch. Only available for the same modes as the "hardware period", explained just above, and if the hardware period is "auto".
Also, this pitch can be used in Soft To Hard to add more desynchronization between the waves.
Retrig
This is an option that is not very used, not very useful, and yet not very easy to explain and understand! When checked, it will restart the hardware envelope. When playing every line of an instrument, if the same hardware envelope is used, it is only triggered once: at the beginning. This is the desired behavior in 99% of the cases. However, to force the curve to restart, simply check this option.
It clearly sounds bad in a fast loop, so slow down the speed of the instrument and check if it sounds as you want. This option is useful when wanting to make an impulse, a new attack, to the hardware curve. Just don't do it too quickly, unless you try to produce special (and disgracious) effects.