I believe that practicing makes you better. I also don't want to enumerate all the keys and functions of this software. Boring!
Let's create a song! Anyone can follow this tutorial, even those who never used a tracker before. I actually encourage every user to follow this tutorial, even those already experienced with STarkos and Arkos Tracker 1. I only advise you to first read the page called User Interface Overview just to get a glimpse of the various panels of the UI. Also, note that this tutorials relies on the default keyboard mapping, so if you've tweaked it, don't blame me if the shortcuts shown here are not the same as yours!
The beginning
Arkos Tracker 2 (or AT/AT2) starts with an empty song. This is a good start. The software also kindly created empty tracks, called 0, 1 and 2, as you can see in the Linker:
![]()
This is in these tracks that our notes will be written. Move your eyes to the middle left of the screen to the Instrument List. A first default instrument is present: "first". We will use it to create our first melody. We'll create our own a bit later.
Let's hear something!
Before laying our notes down, we want to make sure our "small beep" sound can actually be heard. Maybe your sound card is faulty? Or my software buggy? Let's move your eyes at the bottom to the Test Area. Press F6 to give focus to it. A red rectangle around it shows it has focus. Now start pressing some keys on your (real) keyboard. AZERTY owners will pressed A to Y, QWERTY owners: Q to Y. How fun! A small beep should be heard (if not, consult the File > Setup page). Notice how "right" you go on your keyboard, the frequency increases.
You can also use lower notes by pressing W to N for AZERTY owners, Z to N for QWERTY owners. These are the sames notes, one octave below.
Want more notes? You can select the base octave either by changing the "octave" at the top of the screen ![]() , or by pressing Shift+Numpad+ to increase it, Shift+Numpad- to decrease it. After changing the octave, play some notes to hear the change.
, or by pressing Shift+Numpad+ to increase it, Shift+Numpad- to decrease it. After changing the octave, play some notes to hear the change.
You can also click on the Piano to emit some notes.
Writing the first melody
Everything is ready to write our first (great) melody. Above the test area is the pattern viewer. This is the main element you will be working with, so don't hesitate to stretch its size if it is not big enough: go above it till the mouse changes, then click and drag the handle vertically.
Give focus to it. Either by clicking inside it, or by pressing F2 (remember this key!). Notice how pressing the QWERTY/AZERTY keys also produce sounds. However, nothing is written yet.
What you see is called pattern. It is simply a group of tracks. The tracks are the 0, 1 and 2 that you saw in the linker above. So far, all three are empty. You should see your cursor. Use the up/down keys to change the line where your cursor is. By using Home/End, you can move to the first and last line of your pattern. The last line should be marked "0x3f", or 63 in decimal. If you look at the linker, you can see that our first (and only) pattern is 64 lines. This matches, because the first line is 0. So 0->63 = 64 lines.
Your can clearly see your 3 tracks. But each is composed of many columns. What the hell is that? Don't worry, it's simple. Plus, a little help at the top of the pattern indicates what is under the cursor, so you'll never get lost:
![]()
Move your cursor at the top/left of your first track. It looks like this:
![]()
We will write our first note. For this to be possible, the Record mode must be on. Either click on the Record button at the top of the screen ![]() , or press Ctrl+Space (this combinaison doesn't work on Mac: use Ctrl+R) . Look at the Record button: it is bright red.
, or press Ctrl+Space (this combinaison doesn't work on Mac: use Ctrl+R) . Look at the Record button: it is bright red.
Makes sure the octave is 4 (you've learned how to check and change it before).
Press A (AZERTY) or Q (QWERTY). Yay! Our first note! You should see C-5 01. What does it mean? Simple: "C" is the note, using the English notation ("C" for "do", "C#" for "do#", etc. In order: C, C#, D, D#, E, F, F#, G, G#, A, A#, B).
"5" means the octave 5 is used. "01" means instrument 1, which is "First".
The other columns are reserved for effects, which we will use only later, so let's forget about them for now.
You have written one note of our masterpiece. Let's hear it again. But how? Simple: press F9, or click on the ![]() icon at the top of the screen. The pattern will scroll automatically, playing the notes as it encounters them. Wait for the whole pattern to loop, and stop the playing by pressing F12, or by clicking on
icon at the top of the screen. The pattern will scroll automatically, playing the notes as it encounters them. Wait for the whole pattern to loop, and stop the playing by pressing F12, or by clicking on ![]() .
.
Want a more handy shortcut? Press space to play/stop the pattern!
One note does not make a song. Let's add more! Go to the top of the pattern, and add these ones:

If at any time you put an unwanted note, move your cursor above it and press Backspace. Read what follows to know of the ways to listen to your notes.
Playing the music
There are several ways to listen to your music. The most obvious are the ones described above via the F9/F12 or Space.
One other way is to press Enter in the pattern viewer: this plays the line where your cursor is.
Another handy way to play and edit the song is to press the play song icon (or press F9) like seen before, but then click on ![]() at the top of the pattern viewer or press Ctrl + F: your cursor will not follow the what is played anymore: you can thus add notes while the song is played. Added notes won't be heard anymore till the "play cursor" reaches them.
at the top of the pattern viewer or press Ctrl + F: your cursor will not follow the what is played anymore: you can thus add notes while the song is played. Added notes won't be heard anymore till the "play cursor" reaches them.
Shrinking the pattern
By now, if you entered the notes correctly, you should hear this:
This is great (yes it is!), but the pattern is too long: it would be nice if the melody could be played without the big blank that comes after it. There are different way on handling this, depending on your music. You can add new notes if you consider your melody should continue. Or you can shrink the pattern. This is what we are going to do.
Go to the Linker, select the "height" of the unique pattern of our song, and change it from 0x40 (64) to 0x10 (16):
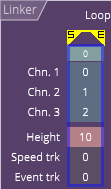
Go back to the pattern viewer, and go to the bottom of the pattern, it is now smaller. Press F9 to play the song: the melody now goes smoothly. You've just discovered how to set a height to our pattern. Obviously, every pattern can have a different height, from 1 to 128.
The instrument editor
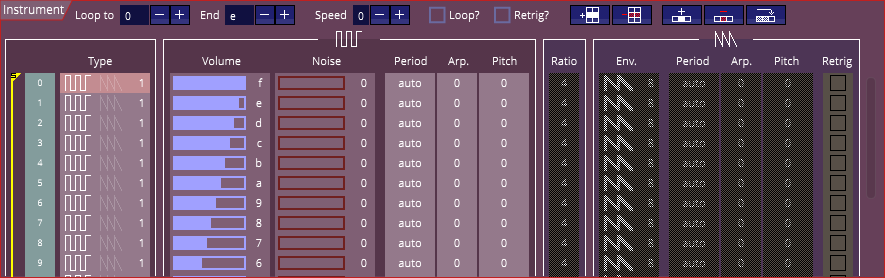
Ok, now it's time to improve our sound a bit. The melody sound is a bit dull. Let's examine the sound called "first". Double-click on its name in the instrument list in the middle left of the screen. When double-clicked, it is both selected and it opens the instrument editor, which looks like this:
Don't be scared. For more detailed information on the editor, please have a look here. We'll have a quick overview for now.
The lines composing the instrument are read fifty times per second (50hz), by default. When all the lines are read, as the sound doesn't loop, the sound stops.
Look at the first line:
![]()
The first column shows a rectangular wave and a disabled triangle wave. This is the "type" of the line. It means that we are using the square (software) wave, and not the triangle (hardware) wave. This is the most simple sound mode on the AY/YM. Then, we have the volume, set to 15 (0xf), which is the maximum, full volume. In "period", we can see "auto". This means that the period of the sound (consider the period as the "height" of the note) is calculated automatically according to the note of either the keyboard, or the music. This is the default mode, and you will most of the time use it.
The second line is the same, except the volume is 14. The following lines are the same, with a decreasing volume. You can well understand how all this sounds like.
Now we want to hear the sound. How to do that conveniently?
Testing an instrument
There are various ways to do that:
- You can simply play your song by pressing F9. This works but not always ideal, especially if your sound become lost among all the other sounds of the music. You probably want to listen to it exclusively!
- You can press Enter to play it, using the note displayed in the Test Area below. This is handy because the instrument editor doesn't lose focus, so you can continue editing your instrument seamlessly.
- Press F6 or you go to the Test Area and click on the "note" button on the right. Here, you can use your keyboard to play notes. Notice how the button text changes according to the notes that are played. Press F5 to go back to the instrument editor.
- A handy option is the "replay" option in the Test Area, at the bottom-right. Select "replay every 1s". Go back to the instrument editor by pressing F5 and press Enter to listen to it. The sound will be retrigged every second.
Heard enough? Press F12 or esc to stop the sound/the music.
Editing an instrument
For our first test, we will make the sound loop, making it more "lively", albeit less realistic. Click on the "loop?" button at the top of the instrument: ![]()
Listen to the sound by using on the mean described above (for example, press Enter). Great, the whole sound loops. Change the "loop to" to 3 and "end" to 9. Notice how the change is directly heard, if your were still playing the sound. On the left of the instrument is a yellow line:
![]()
It shows where the sound ends, and where it loops. You can change this directly by clicking besides any line, over the yellow line. A "S" (start) or "E" (end) appears in overlay.
Press F9 to listen to the song, F12 to stop. Isn't it better (or at least, different)?
Let's have some fun. Just like in the pattern editor, you have a cursor. Click on any "cell" for it to appear. You can then use the cursor to move it.
Move to the line 0, "arp" column, press "C", and Enter to validate:
![]()
The new sound should have a nice attack with an octave higher (C meaning 12 in decimal, hence on octave). Negative number are also possible.
Go inside the looped area and put also an arpeggio to 7, for example line 6. Isn't it great?
Go back to where you put the "7", and press Ctrl + up/down: this conveniently changes the value of one unit. By using Shift + Ctrl + up/down, the value is increased or decreased by a larger step.
Press Space: this copies the selected value to the cell below.
Also, feel free to change the Speed at the top of the instrument editor ![]() : "0" is the fastest speed, "FF" the slowest. You can change the value either by clicking on the value and typing the number, or via the mouse wheel.
: "0" is the fastest speed, "FF" the slowest. You can change the value either by clicking on the value and typing the number, or via the mouse wheel.
Creating an instrument
... To be continued!