In this tutorial, we're going to see how your (great) music can be used inside a production. Exporting itself is very simple. Using it is simple too, but there are many subtleties on how to do that, because AT2 targets many platforms, many assemblers, many people (millions!).
Note: Steph' has written a french article about this, thanks a lot to him!
So I will explain, step by step, how to export a song, and how to use it in a small tester, built from scratch. And as many people use other assembler than Rasm (such as SDCC), I will also show how to integrate them.
I consider you have a song. If not, create one now... I'm waiting.
... But for this example, we'll use an already existing one: A Harmless Grenade, which is in the songs\ArkosTracker2\3Channels folder of the package.
Important note: The example here uses the export via a graphical interface. This is the ideal step when learning AT2. However, if you want to speed things up and automatize the process, you can use the command line tools in the tools folder of the package.
Start by loading the song, or drag'n'dropping it. Now, let's try to export it. Go to File/Export:
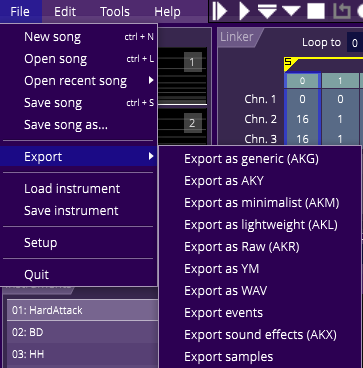
Ok... As you can see, we have many possibilities. Deciding which player to choose is discussed in length here. Let's just say that:
- AKG is the best compromise between speed/efficiency.
- AKY is very fast, but takes more memory (not ideal for a game).
- AKM is slower but the most compact. Good for a 4k demo or even a game.
- AKL is now rather obsolete, it is slightly faster than AKM, but less powerful and less compact.
We will choose the AKG. Working with the other players is very similar anyway.
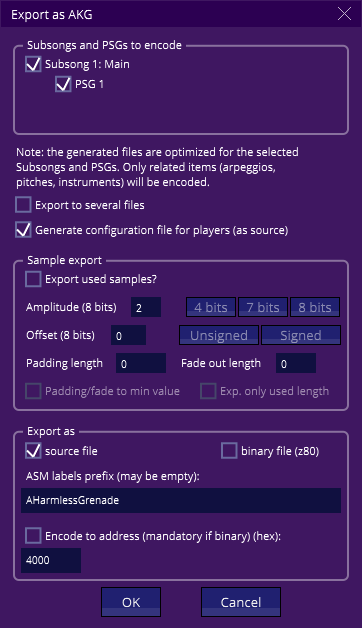
The top panel shows what to export, as a song may be composed of several subsongs, each sharing the same instruments and arpeggio/pitch tables. Here, we only have one subsong, so there is nothing to do.
Make sure the "generate configuration file for players" is ticked: this feature will generate a small file to let the player know exactly what the song requires. For example, if you don't use hardware sounds, or noise, then the parts of the code that manage that won't be compiled! This will save both memory and CPU. More on this here.
Forget about the "sample export" panel for now, we don't have any samples.
The "export as" panel at the bottom is interesting. It will allow you to export as source or binary (Z80 only!). Most of the time, you will want to "export as source file", because this allows relocation easily. So let's check that. The ASM labels prefix is a prefix written before every generated label in the source. This is useful if you plan on having several songs, and want to avoid label clash. If you don't know anything about what I just told, don't worry! Let it be. For this tutorial, set it to "AHarmlessGrenade", it will be easier to find the music labels later.
Make sure the "encode to address" is unchecked, else an ORG is added, forcing the address in the source. Most of the time, this is unwanted because we will include the music source directly in your production source, and let the assembler "decide" where to put it in memory.
Press OK! Give a simple name to your song, such as "Grenade.asm". Two files have been generated: "Grenade.asm", which is the song itself, and a tiny "Grenade_playerconfig.asm", which is the "player configuration" file I told you about.
Ok, the first part is done, yay!
Do you need also some sound effects? If yes, check out this page, then once sound effects are generated (along with their player configuration too), continue to the next part of this tutorial!