By selection the File > Setup > Audio/MIDI interfaces, a dialog opens:
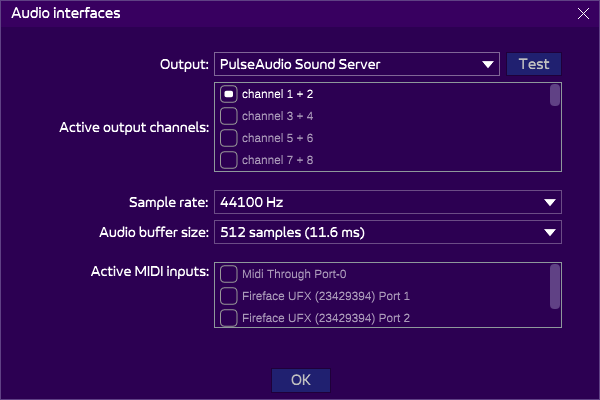
At the top is the output, which varies according to your setup. On Windows, it is advised to use ASIO drivers (if your soundcard allows it, or ASIO4All as a fallback) if you want to lower the latency as much as possible.
The active output channels indicates where the sound is output. This is the output you probably plugged your speakers or headphones, or where your laptop has its speakers rigged to.
A sample rate of 44100 Hz is enough, more is overkill.
The audio buffer size has a direct relationship with the latency (a high latency provokes a noticeable duration between you pressing a keyboard note and actually hearing it). The lower the better obviously (less than 20 ms is advised), but the smaller the buffer, the more overhead it produces on your CPU. If you hear crackles and pops when playing a song, raise the buffer size. The quality of your sound card greatly influences the latency.
Then are the MIDI inputs, for you to play notes with your MIDI keyboard. If you had used a MIDI keyboard previously, it should be selected as active. If adding a new MIDI keyboard, make sure it is selected here.
At the bottom of the screen is an option called “Add current octave to input MIDI notes“, off by default. It is useful if you are using a MIDI keyboard, and it is either small, or changing its octave is bothersome. In this case, activate this option, and the octave (at the top of the screen) will be added to the input MIDI note, with the octave 4 being “central”: 4 means “+0 octave”, 5 is “+1 octave”, etc. 3 means “-1 octave”, 2 mans “-2 octaves”, etc. This option makes changing the octave on your MIDI keyboard easier because you do it via the octave at the top of the screen, not some hidden option on your MIDI keyboard.